
By Michael Munk
This will be the second step on our way to understanding “the exposure triangle” and therefore achieving absolute control over our camera.
© Copyright by MunkPhotography.com
Exposure: 1/100
Aperture: f/2.8
ISO 100
Focal length: 100mm
When you get to the point where you have reach an understanding for the technical aspect and learned how to control light you can start to unfold your creativity for real.
Aperture is the enchantment of photography. This is the most important feature in directing light inside your camera. As I will show you in this article changing the aperture leads to dramatic changes in the appearance of your image!
Learn to control aperture and you will learn the magic of photography.
Previously (in “the xposure triangle”) I gave a metaphor for a better understanding of the elements inside a camera. As you might remember aperture is both the size of the window and the effect of pulling the curtains. There will be more about this in a moment.
We learned (in “shutter speed”) that shutter speed is measured in parts of a second (denomination 1/200). Aperture is measured in f-stops (f-number, focal ratio, f-ratio or relative aperture). As mentioned before; a change in shutter speed or aperture doubles or halves the amount of light coming through your lens. I gave this following example of three exposures resulting in similar images:
- 1/125th and f/11
- 1/250th and f/8
- 1/500th and f/5.6
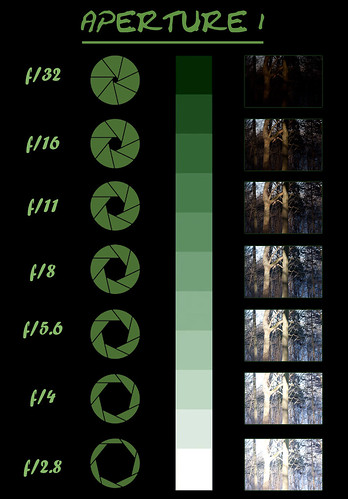
The next image illustrates the effect of increasing f-stop (f/2.8 – f/4 – f/5.6 – f/8 – f/11...) with a fixed shutter speed and ISO speed. As you can see this decreases the aperture. One-stop increment will effect in halving the “light gathering area”.
© Copyright by MunkPhotography.com
The illustrated circles are actually pretty much what your lens opening looks like. In some lenses you can see these blades when looking direct through it (without camera house attached).
Another rule of thumb which is handy to keep in mind is the “Sunny 16 rule”. It is quite simple. When photographing an object in direct sunlight use this as “starting point”.
“Set the aperture to f/16 and the shutter speed to the same as (reciprocal of) the ISO speed.”
- f/16 ISO 100 1/100th sec
- f/16 ISO 200 1/200th sec
- f/16 ISO 400 1/400th sec
Of course in real life it all depends on which type of photo you want. For an example in landscape photography the guideline below is often useful.

© Copyright by MunkPhotography.com
Exposure: 1/200
Aperture: f/22
ISO 200
Focal length: 17mm
Start with one the following f-stop (corresponding to the conditions) and adjust shutter speed afterwards.
- f/22 Snow/sand – a lot of reflection and therefore a lot of light
- f/16 Sunny
- f/8 Slight overcast
- f/5.6 Heavy overcast (f/5.6 is not really ideal for landscape (see DOF below). Keep a smaller aperture and push the ISO speed instead.
I remember one single thing that took ages to understand and remember when I started with a more “serious” form of photography.
That these two facts apply (look at “aperture 1” above for better understanding):
- a small f-number is a large aperture (bigger opening and therefore more light).
- a large f-number is a small aperture (smaller opening and therefore less light).
Depth of Field (DOF)
As a new photographer you will feel bombarded with different AND difficult technical terms and abbreviations. Not all of these are really important. But “Depth of Field” is one of the important ones!
I have taken a series of photos with the single purpose of exemplifying what DOF is and how to use it in a creative way. There are a number of ways in making a shallow depth of field.
First let us have a look at what depth of field involves.
- Large depth of field – most of the image will be in focus. Both objects close to the camera and far away. (E.g. landscape, the picture of a costline above)
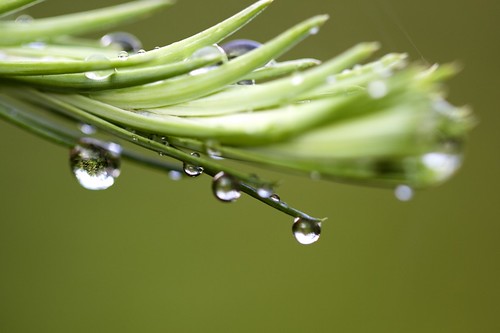
- Small (shallow) depth of field – only a little part of the image will be in focus and the rest will be blurry. (E.g. macro, the picture of dew in the start of this blog)
And more important – how to get these two different effects:
- A large aperture (small f-number) will result in a shallow DOF.
- A small aperture (large f-number) will give a larger DOF.
The following is meant to show three ways of changing the depth of field. I will not go deeper into the theory behind why these effects occur as this will get a bit too technical at this point. Just note that it's the way it is.
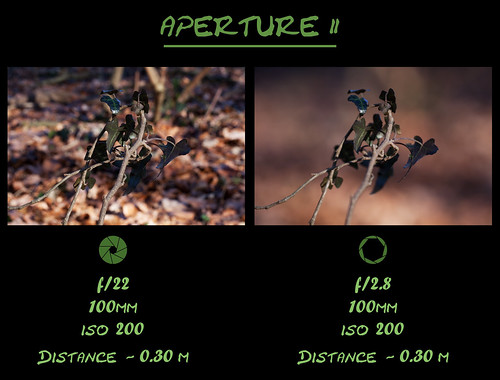
The first method (Aperture II): The obvious way is, of course, to use either a small or a large aperture.
- Image on the left: When using a small aperture (small opening) the leafs in the background makes it hard to make out the details of the branch in front
- Image of the right: It is a different story with a large aperture. Here the background is all fuzzy which “hides” all the disturbing elements.
© Copyright by MunkPhotography.com
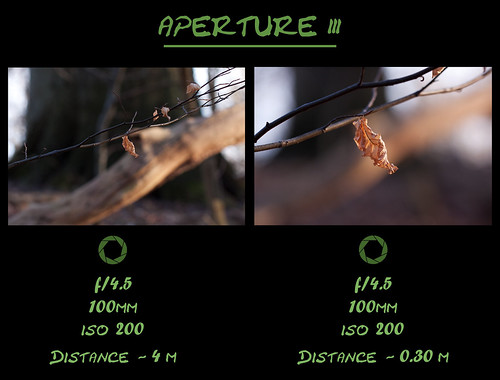
The second method (Aperture III): As you can see below (“Aperture 3”) changing only the distance (camera – object) will have an effect on DOF. This is, among other things, useful in portrait and macro photography.
© Copyright by MunkPhotography.com
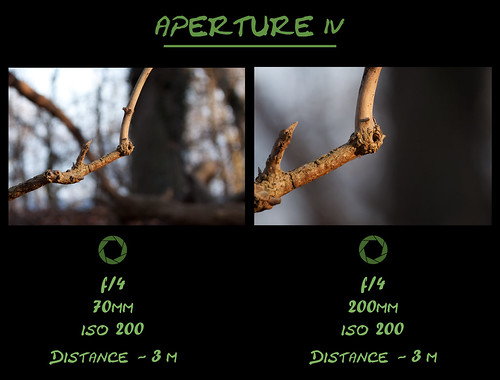
The third method (Aperture IV): The focal length will affect the DOF. Again this is why portrait photographers often use a telephoto lens.
© Copyright by MunkPhotography.com
Just to drive home what depth of field is I have made this illustration (below). It is extremely simple but hopefully it gives a visual idea of the concept of depth of field.

© Copyright by MunkPhotography.com
One last thing that I personally find really important is that "less is more". The simpler you keep an image the greater effect it will have on the viewer. I will return to this subject later on but DO notice that DOF is an effective way of keeping an image simple.
And as always I want to state that you need to grab your camera and go experimenting on your own! Use different setting and break out of your comfort zone – the auto-mode!
Enjoy!
Ingen kommentarer:
Send en kommentar