mandag den 11. april 2011

Waterfall

Basic theory behind capturing a waterfall or a river
By Michael Munk

Amazing silk-like waterfalls and smooth fantasy-like rivers. These are images you will often see in magazines or on websites. At first sight it looks like an awfully difficult picture to take, or something made by a professional in some kind of editing program. These assumptions are not true!

Autumn leaves
© Copyright by MunkPhotography.com
Exposure: 0.4 sec 
Aperture: f/13
ISO 100
Focal length: 17mm

In the following I will show you the stepping stones necessary for creating such images yourself.

Silk-like water images are relatively easy to make!

In my first years of photography I remember the frustrating situations when I got to a waterfall or any other location with waterflow – how do I get the best of this opportunity?? Water has always fascinated humans, and few things are more impressive than standing at the foot of a majestic waterfall. The deafening roar of the thousands of liters of water falling over the edge every day.

BUT how do I possibly capture even a fraction of this intense atmosphere?

First of all there are two basic things to consider if you have a moving object such as running water:
  • Freeze – Do I want to freeze the picture to capture the fascinating details of the water?
  • Motion – Do I want to enhance the motion of the water to ad a dynamic touch?

The first is “less complicated” than the second one, so let us begin with “freezing a waterfall”.

As we learned previously in shutter speed when freezing an image we have to look at the lighting setting: 

  • Is it early in the morning? 
  • Or is it during the brightest hour on a sunny day? 
  • Or perhaps on a rather dim overcast day.
You will probably need a shutter speed faster than 1/60th of a second to accomplish this, and an aperture smaller than f/5.6 (so a lager f/”number” e.g. f/5.6 - f/22) to get a large enough DOF (depth of field) to capture all the details but not too small either thus you might block out too much light to use the faster shutter speeds.

And now back to that silk-like effect.
To motion-blur the water - this is the option many photographers chooses. I think one of the main reasons for this, is the fact that it is an effect easily achieved with DSLR, but pretty difficult with a normal pocketsize camera. Another reason is because the auto-mode most likely would select the settings fit for freezing the water.

In other words: making that blurred water effect shows that you can step out of auto-mode and use the potential of DSLR cameras.


Rhine fall by night
© Copyright by MunkPhotography.com
Exposure: 332 sec 
Aperture: f/4
ISO 200
Focal length: 40mm

How do they do it?
First of all you will need a tripod or at least a rock (or anything else like it) to position your camera. Of cause this is important as we are working with longer shutter speeds (as I talked about in shutter speed).

Next step: When the camera is on the tripod and the (potentially) right composition is chosen, you will have to leave auto-mode and use shutter-priority or manual-mode. 
Depending on the light conditions and amount of blur you want I will recommend shutter speeds close to 1 sec.

Unfortunately it is not always as simple as described above. Because when pushing the shutter speed to blur the motion of the water you always risk ending up with an over exposure. With parts of the picture either partly or totally “blown out” with too much light. This will be bright white areas without any details (e.g. an over exposed sky will appear bright white without any contours).

There are different ways of dealing with this issue:

Low ISO – Keep the ISO speed as low as possible. (e.g. ISO 100). In that way the sensor is less sensitive to light (see the article on ISO speed for more information) and this will allow a longer shutter speed.  

Aperture – If it is several hours after sunrise or before sunset there might be a lot of light so you have to close the aperture (e.g. f/22) This will let the smallest amount of light inside the camera during the long exposure. Below is an example of this.

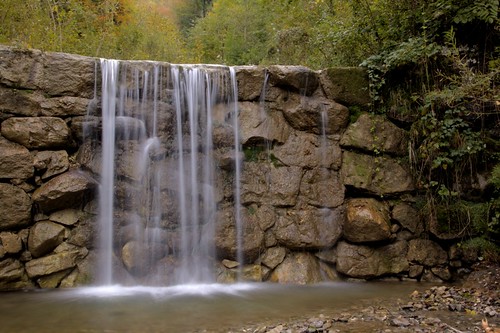
Small waterfall
© Copyright by MunkPhotography.com
Exposure: 1 sec 
Aperture: f/22
ISO 100
Focal length: 40mm


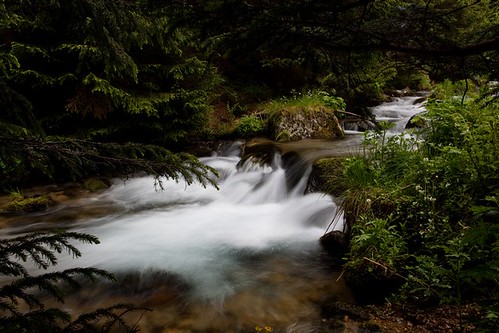
Time of the day – Pictures of water with a blurry effect is almost only possible if the weather is overcast or early in the morning or late in the evening. Again this is simply because there are too much light during daytime hours. Sometimes being in a dense forest create low enough light conditions to get a long enough shutter speed (see picture below which is taking on a sunny midday). 
Another way is to do a very long exposure at night (like the second picture above, of Rhine fall)

River flowing
© Copyright by MunkPhotography.com


Filters – Now you might ask how these pictures with blue sky, sun and silky water are made. The simple answer to this is –  use of filters. This is another great features you have with DSLR compared to compact cameras. You have the opportunity to put on different filters. In this case a ND-filter (Neutral Density filter). I will get further into this subject later on. But in short they work like sunglasses which are placed in front of the lens. Depending on the strength of the polarization they are letting less light through the lens. 
Below are three examples of normally used ND-filters:

  • ND2               Reduces with 1 f/stop           50% of the light is transmitted
  • ND4               Reduces with 2 f/stops         25% of the light is transmitted
  • ND8               Reduces with 3 f/stops         12,5% of the light is transmitted

Note that there are other ways of using ND-filters, but this is what most use it for.


Now it is time to go out there and practice! Use this basic theory, but don’t be limited by it!  

To end this subject I have found a couple of other examples and ways of capturing a waterfall.

First look for ways to make the waterfall a part of a bigger picture. Like this one where you might not notice the fall at first until your eyes follows the line created by the blue sky which leads directly to it. 

Waterfall in the forest
© Copyright by MunkPhotography.com
Exposure: 1/50 
Aperture: f/11
ISO 100
Focal length: 17mm

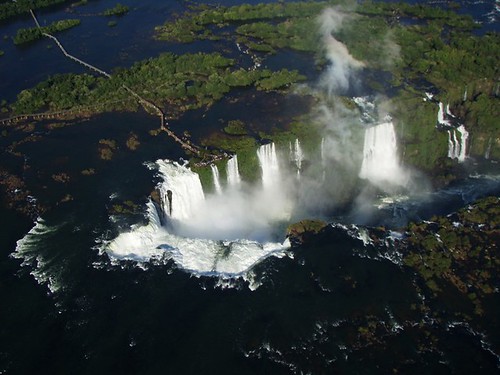
Another way is to get a whole new perspective. Pictures like the one of Iguazu falls below are a bit more expensive as it requires either a plane or a helicopter.  But sometimes the pictures and the memories are worth it!
Iguazu falls
© Copyright by MunkPhotography.com


And finally you will sometimes need to introduce some recognizable objects in front of the falls to get a sense of perspective. And I will bet that you can come up with something a lot more original than this example. :-)

Skogar waterfall
© Copyright by MunkPhotography.com
Exposure: 1/125 
Aperture: f/18
ISO 100
Focal length: 17mm

Enjoy all the great wonders of water out there!

torsdag den 24. marts 2011

ISO speed

Basic camera technique – part three of three
By Michael Munk

This is the last brick that we have to add to our base for mastering the technical aspect of photography.
The last part of the Exposure triangle left to learn about is ISO speed. This will give us a whole new dimension of control in low light situations.

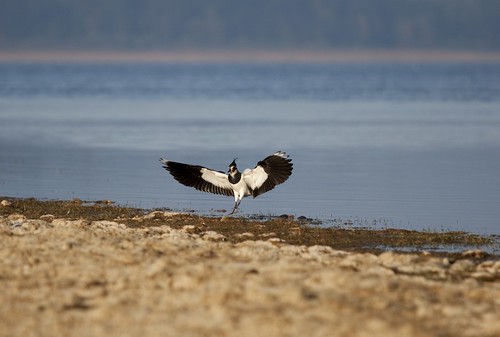
Lapwing touchdown
© Copyright by MunkPhotography.com
Exposure: 1/1000 
Aperture: f/4
ISO 100
Focal length: 200mm


In “the old days” ISO (International Standards Organization) made this standard for measuring the speed of film for photography. It simply means how fast a film responds to light. Before digital photography you had to change to another film. Luckily with the modern cameras we only have to push a button, and the sensor inside the camera becomes more or less sensitive to light.

A low number gives low sensitivity to light.

Picture it like putting on sunscreen before sunbathing.

  • ISO 100         A sun blocker with a high factor – You can stay for hours without getting a sunburn.
  • ISO 1000       Normal medium factor sun blocker – You will get a suntan faster.    
  • ISO 6400       Almost like putting on pure water – You will get sunburnt fast.

So when and why to use the ISO setting? When I have to choose which settings to use I always ask myself some basic questions. I will return to these later on in this article. First I want to give some basic guidelines for the ISO speed in priority- or manual-mode:

  • ISO 100         On a sunny day you should keep the ISO low!
  • ISO 400         On an overcast day or at dusk and dawn
  • ISO 800+       Inside at night without flash
Remember to keep the ISO as low as the conditions allows it

So far so good. We have a setting to compensate for low light conditions. But what is the catch?

The higher ISO the lower quality of the image

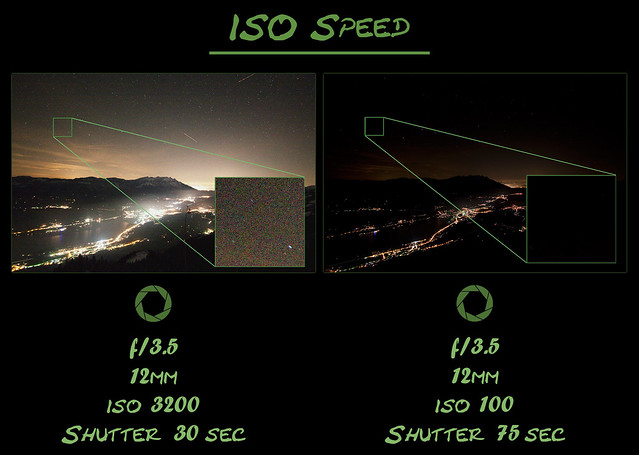
ISO 100 will give crisp and razor-sharp images (with little noise/grain). Like the image of the lapwing in the beginning of this blog. The more you bump the ISO the more noise you will get. Below I have made a comparison of two images, from the same location a few minutes apart, to illustrate the downside of choosing a high ISO speed in low light.


ISO
© Copyright by MunkPhotography.com

Now with this knowledge let us get back to a couple of questions to ask yourself before pushing the shutter.
  • What do I want with this image?
  • How do I achieve this?
  • How is the lightning?
  • What aperture and shutter speed will it require?
  • What is the lowest ISO speed to make this possible?

And then some more concerning composition, but that is another article to be made in the future.
Here are situations where a higher ISO is useful:

  • Indoor family get together    some times a flash would just ruin the moment
  • Indoor sport event                 fast moving objects in poor light
  • Concert                                    again low light
  • Indoor architecture                fx churches and galleries have rules against the use of flash

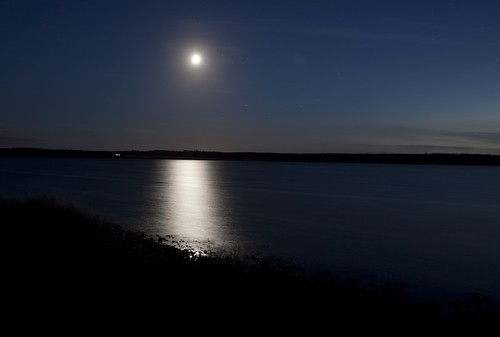
Another example is the next two images both taking during a full moon. Depending on the setting you will get different results.

A low ISO speed and a long shutter speed will give this glowing light effect
Moonlight painting Vandet sø
© Copyright by MunkPhotography.com
Exposure: 25 sec 
Aperture: f/4
ISO 100
Focal length: 22mm

A high ISO and faster shutter speed will capture details and create another mood
Super moon
© Copyright by MunkPhotography.com
Exposure: 1/80 
Aperture: f/4
ISO 500
Focal length: 200mm

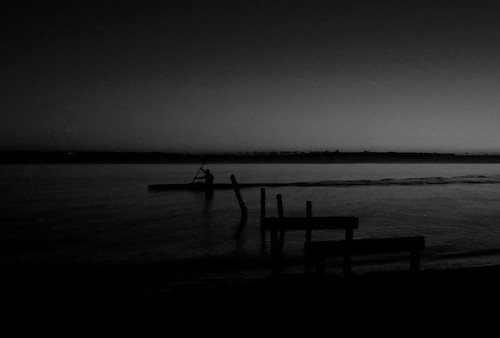
How to use high ISO in a creative way? If you have the right scenery, then a grainy and noisy images will result in a special mood and a raw appearance. Like this last image.

Kayaking before the sun rises
© Copyright by MunkPhotography.com

Exposure: 1/50 
Aperture: f/4
ISO 1000
Focal length: 17mm


Of course there are really good tools in post production (PP) to reduce, or ad, noise from your pictures. I will not go further into this at this point. But still these various types of software will improve a lot of the unwanted noise. I will return to this later on.    

Generally you want to keep the ISO as low as possible. But make sure to bump it up when needed. It is the only way to get the result you are after.

Enjoy!

torsdag den 17. marts 2011

Aperture

Basic camera technique – part two of three
By Michael Munk

This will be the second step on our way to understanding “the exposure triangle” and therefore achieving absolute control over our camera.
Aperture
ISO speed


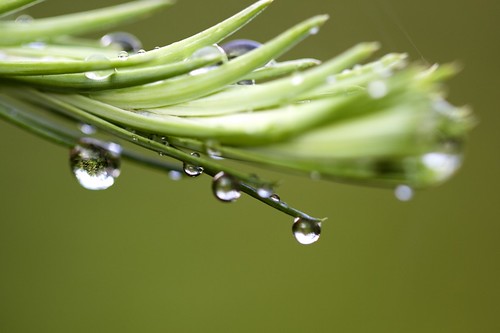
Dew on Conifer
© Copyright by MunkPhotography.com
Exposure: 1/100 
Aperture: f/2.8
ISO 100
Focal length: 100mm


When you get to the point where you have reach an understanding for the technical aspect and learned how to control light you can start to unfold your creativity for real.

Aperture is the enchantment of photography. This is the most important feature in directing light inside your camera. As I will show you in this article changing the aperture leads to dramatic changes in the appearance of your image!

Learn to control aperture and you will learn the magic of photography.

Previously (in “the xposure triangle”) I gave a metaphor for a better understanding of the elements inside a camera. As you might remember aperture is both the size of the window and the effect of pulling the curtains. There will be more about this in a moment.

We learned (in “shutter speed”) that shutter speed is measured in parts of a second (denomination 1/200). Aperture is measured in f-stops (f-number, focal ratio, f-ratio or relative aperture). As mentioned before; a change in shutter speed or aperture doubles or halves the amount of light coming through your lens. I gave this following example of three exposures resulting in similar images:

  • 1/125th and f/11
  • 1/250th and f/8
  • 1/500th and f/5.6

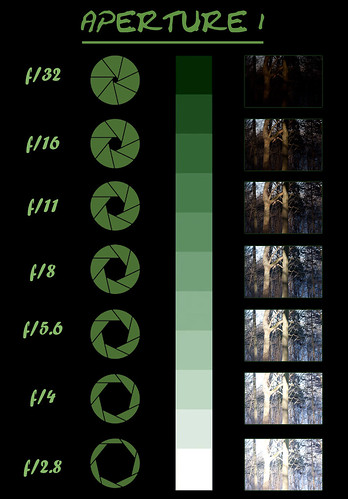
The next image illustrates the effect of increasing f-stop (f/2.8 – f/4 – f/5.6 – f/8 – f/11...) with a fixed shutter speed and ISO speed. As you can see this decreases the aperture. One-stop increment will effect in halving the “light gathering area”.
Aperture 1
© Copyright by MunkPhotography.com

The illustrated circles are actually pretty much what your lens opening looks like. In some lenses you can see these blades when looking direct through it (without camera house attached).


Another rule of thumb which is handy to keep in mind is the “Sunny 16 rule”. It is quite simple. When photographing an object in direct sunlight use this as “starting point”.

“Set the aperture to f/16 and the shutter speed to the same as (reciprocal of) the ISO speed.”


  • f/16                     ISO 100              1/100th sec
  • f/16                     ISO 200              1/200th sec
  • f/16                     ISO 400              1/400th sec

Of course in real life it all depends on which type of photo you want. For an example in landscape photography the guideline below is often useful.


Cost of Thy - Bulbjerg
© Copyright by MunkPhotography.com
Exposure: 1/200 
Aperture: f/22
ISO 200
Focal length: 17mm

Start with one the following f-stop (corresponding to the conditions) and adjust shutter speed afterwards.

  • f/22     Snow/sand – a lot of reflection and therefore a lot of light
  • f/16     Sunny
  • f/8       Slight overcast
  • f/5.6    Heavy overcast (f/5.6 is not really ideal for landscape (see DOF below). Keep a smaller aperture and push the ISO speed instead.

I remember one single thing that took ages to understand and remember when I started with a more “serious” form of photography.

That these two facts apply (look at “aperture 1” above for better understanding):


  • a small f-number is a large aperture (bigger opening and therefore more light).
  • a large f-number is a small aperture (smaller opening and therefore less light).

Depth of Field (DOF)
As a new photographer you will feel bombarded with different AND difficult technical terms and abbreviations. Not all of these are really important. But “Depth of Field” is one of the important ones!

I have taken a series of photos with the single purpose of exemplifying what DOF is and how to use it in a creative way. There are a number of ways in making a shallow depth of field.

First let us have a look at what depth of field involves.  


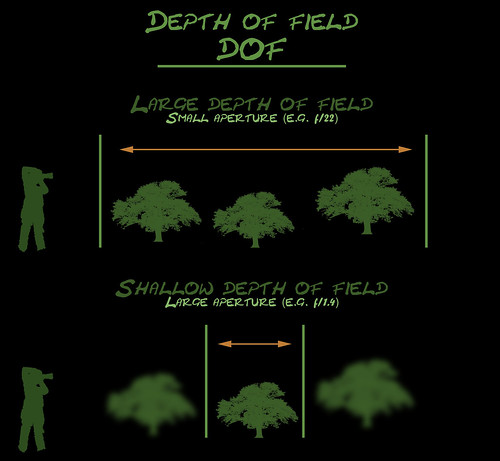
  • Large depth of field – most of the image will be in focus. Both objects close to the camera and far away. (E.g. landscape, the picture of a costline above)
  • Small (shallow) depth of field – only a little part of the image will be in focus and the rest will be blurry. (E.g. macro, the picture of dew in the start of this blog)

And more important – how to get these two different effects:


  • A large aperture (small f-number) will result in a shallow DOF.
  • A small aperture (large f-number) will give a larger DOF.

The following is meant to show three ways of changing the depth of field. I will not go deeper into the theory behind why these effects occur as this will get a bit too technical at this point. Just note that it's the way it is. 

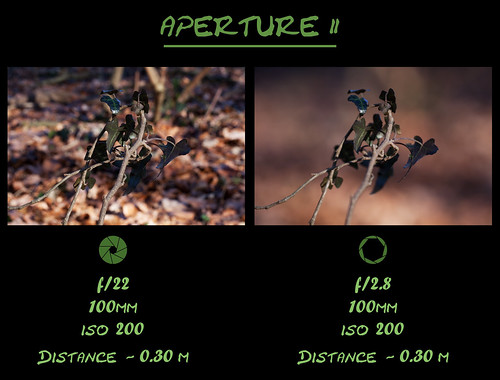
The first method (Aperture II): The obvious way is, of course, to use either a small or a large aperture.

  • Image on the left: When using a small aperture (small opening) the leafs in the background makes it hard to make out the details of the branch in front
  • Image of the right: It is a different story with a large aperture. Here the background is all fuzzy which “hides” all the disturbing elements.
Aperture 2
© Copyright by MunkPhotography.com


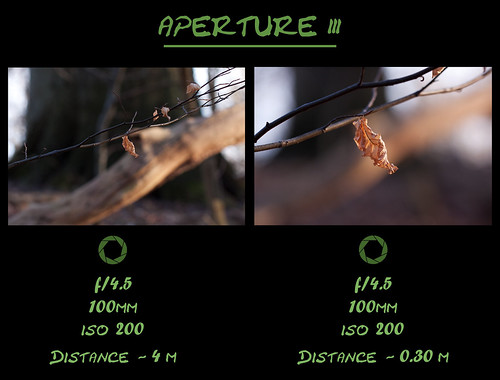
The second method (Aperture III): As you can see below (“Aperture 3”) changing only the distance (camera – object) will have an effect on DOF. This is, among other things, useful in portrait and macro photography.  
Aperture 3
© Copyright by MunkPhotography.com


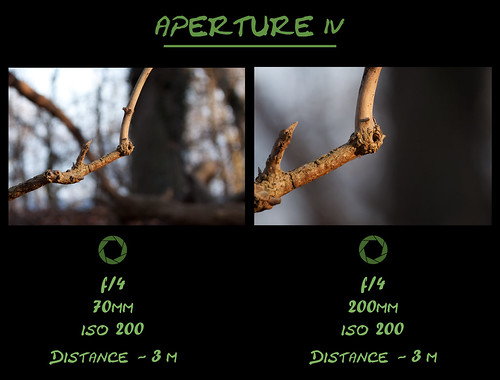
The third method (Aperture IV): The focal length will affect the DOF. Again this is why portrait photographers often use a telephoto lens.
Aperture 4
© Copyright by MunkPhotography.com


Just to drive home what depth of field is I have made this illustration (below). It is extremely simple but hopefully it gives a visual idea of the concept of depth of field.  
DOF
© Copyright by MunkPhotography.com


One last thing that I personally find really important is that "less is more". The simpler you keep an image the greater effect it will have on the viewer. I will return to this subject later on but DO notice that DOF is an effective way of keeping an image simple.

And as always I want to state that you need to grab your camera and go experimenting on your own! Use different setting and break out of your comfort zone – the auto-mode!

Enjoy!  

onsdag den 9. marts 2011

Shutter Speed

Basic camera technique - part one of three
By Michael Munk

This will be the first description of the three elements; shutter speedaperture and ISO speed, that I previously introduced in ”The exposure triangle”.


Before I get started I have two notes for this article. I have given the EXIF informations (Exchangeable Image File Format) for the example images pay attention to these for better understanding. And you can simply click the images for a larger view.

Marathon
© Copyright by MunkPhotography.com
Exposure: 1/40 
Aperture: f/7.1
ISO 125
Focal length: 17mm

The definition of Shutter speed: a common name for exposure time –the effective length of time that the shutter inside the camera is open. Consequently the time light is allowed to reach the camera censor and creating the image.

To control separate parts of “the exposure triangle” you have to leave auto-mode and use either Priority- or Manual-mode. To achieve this turn the “camera mode dial” (on top of the camera) to:

  • Shutter-priority: “Tv” or “S”depending on camera type (Time value/Shutter-priority).
  • Manual-mode:  “M” (manual)

The shutter speed is measured in seconds – often in fractions of a second.

On most modern cameras you can choose between many steps of shutter speeds. To outline this “scale” and give you a better overview I have picked some main points and given a short description and some useful situations. Starting with the fastest shutter speed.

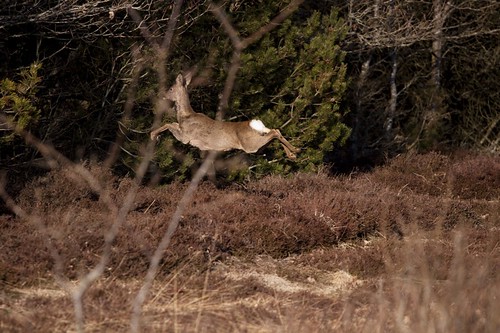
Deer jumping
© Copyright by MunkPhotography.com
Exposure: 1/2500 
Aperture: f/4.0
ISO 250
Focal length: 200mm

1/16000th s:   The absolute fastest shutter speed available (only available on the top models) 

1/8000th s:     Fastest shutter speed for most DSLR cameras. Useful for getting racer sharp images of moving objects (animals, cars etc.). Requires good light conditions, a large aperture (lots of light) and probably push the ISO number up (larger than ISO 100).

1/2000th s:     A fast shutter speed to capture fast moving objects in normal light (overcastted summerday)

1/250th s:       To freeze normal day picture like humans and buildings. This speed also allows a small aperture (f/11) and therefore a good depth of field (DOF). I will explain this in the following article about aperture.

1/60th s:         Slower shutter speed that doesn’t freeze object instead gives a motion blur. Useful in making panning images and getting a small aperture (f/9-f/16) for great landscape shoots with a good DOF.

1/8th s:           Longer exposure which allows the possibilities of creating great motion blur effects. Another use of these slower shutter speeds is, in combination with tripod, bean bag or other camera support (rocks, bag…), to get pictures of immobile object or landscapes in low light conditions.

1 s:                “Only” (I don’t want to kill creativity! There are NO such things as rules, “only when”, “don’t do this, “you can’t do that”… etc. ALWAYS BE CREATIVE AND EXPLORE NEW WAYS!) with use of tripod for low light photography.

30 s:               Longest shutter speed in most DSLR cameras. Used in night photography – long exposure.

BULB:           Keeps the shutter open as long as the shutter release is hold. With a remote control only battery life limits the exposure time. This can be used in star trail photography (30min – infinity). Low light photography is one of my favorite subject areas and I will return to this.

As seconds pass by
© Copyright by MunkPhotography.com
Exposure: 20 sec 
Aperture: f/16
ISO 100
Focal length: 40mm

If you want sharp images “a rule of thumb” is to use a shutter speeds that is greater than the focal length you are using. Let us take an example to understand this rule.

  • If you shoot at 40mm keep the shutter speed higher than 1/40th sec.
  • But if you shoot at 200mm you should go faster than 1/200th sec. (1/200th – 1/8000th sec.)
In theory this is a good rule but in practice

you will be using shutter speeds of 1/60th of a second or faster

Again we need to look at light to find an explanation. Because at 1/60th sec. or slower there is a great risk of camera shake. Which results in blurred or out of focus images. Simply because a handheld camera will move during exposure (changing the “light picture” the camera “sees”).
As I said you can prevent this by stabilizing the camera (using tripod, bag, rock…)

Don’t forget the exposure triangle – a change in one setting will affect the others (ISO and Aperture)

I am afraid the next few lines will get extremely technical so feel free to skip this and read the examples instead.

·         Halving the shutter speed - doubles the exposure (1 EV more)
·         Doubling the aperture (halving the f/”number”) – increases the exposure by a factor 4 (2 EV more)

That explains the fact that standard apertures differ with about 1.4


Let us take an example:
A picture taken at these three different settings will look almost the same regarding exposure (in relation light).
We double the shutter speed (less light manage to reach the censor). To compensate for this we make a bigger opening in our lens with a smaller aperture (remember the window metaphor: “draw back the curtains”)

  • 1/125th and f/11
  • 1/250th and f/8
  • 1/500th and f/5.6
I will give a more detailed explanation of the use of this in a future article.  

Enough with all the technical nonsense for now! Let us look at something more tangible instead.

Questions you should ask yourself before choosing a shutter speed

1.    Plain and simple:         "What am I photographing?" 
                                         "What is the motive?"
    "Are there any moving objects?"
 If yes, then:
2.    Do I want to freeze these objects – make then look still?
3.    Or do I want to make a blur effect on purpose – creating a sense of movement.


Ducks on the move
© Copyright by MunkPhotography.com
Exposure: 1/10 
Aperture: f/4.0
ISO 100
Focal length: 160mm

Many people want all their photos to be as sharp as possible. I agree that a lion portrait with extremely sharp focus right in the eyeball can give you great pleasure to look at.
BUT on the other hand a well done motion blur can generate a special atmosphere, or tell an amazing story which would have been lost in a racer sharp image.


Spice price
© Copyright by MunkPhotography.com
Exposure: 1/25 
Aperture: f/7.1
ISO 100
Focal length: 17mm


When you have shot your perfectly sharp image - DO look for alternative options - be creative! You might get even better images with unusual settings, or at least get some priceless experience!