
By Michael Munk
Amazing silk-like waterfalls and smooth fantasy-like rivers. These are images you will often see in magazines or on websites. At first sight it looks like an awfully difficult picture to take, or something made by a professional in some kind of editing program. These assumptions are not true!

In the following I will show you the stepping stones necessary for creating such images yourself.
Silk-like water images are relatively easy to make!
In my first years of photography I remember the frustrating situations when I got to a waterfall or any other location with waterflow – how do I get the best of this opportunity?? Water has always fascinated humans, and few things are more impressive than standing at the foot of a majestic waterfall. The deafening roar of the thousands of liters of water falling over the edge every day.
BUT how do I possibly capture even a fraction of this intense atmosphere?
First of all there are two basic things to consider if you have a moving object such as running water:
- Freeze – Do I want to freeze the picture to capture the fascinating details of the water?
- Motion – Do I want to enhance the motion of the water to ad a dynamic touch?
The first is “less complicated” than the second one, so let us begin with “freezing a waterfall”.
As we learned previously in shutter speed when freezing an image we have to look at the lighting setting:
- Is it early in the morning?
- Or is it during the brightest hour on a sunny day?
- Or perhaps on a rather dim overcast day.
You will probably need a shutter speed faster than 1/60th of a second to accomplish this, and an aperture smaller than f/5.6 (so a lager f/”number” e.g. f/5.6 - f/22) to get a large enough DOF (depth of field) to capture all the details but not too small either thus you might block out too much light to use the faster shutter speeds.
And now back to that silk-like effect.
To motion-blur the water - this is the option many photographers chooses. I think one of the main reasons for this, is the fact that it is an effect easily achieved with DSLR, but pretty difficult with a normal pocketsize camera. Another reason is because the auto-mode most likely would select the settings fit for freezing the water.
In other words: making that blurred water effect shows that you can step out of auto-mode and use the potential of DSLR cameras.

Exposure: 332 sec
Aperture: f/4
ISO 200
Focal length: 40mm
How do they do it?
First of all you will need a tripod or at least a rock (or anything else like it) to position your camera. Of cause this is important as we are working with longer shutter speeds (as I talked about in shutter speed).
Next step: When the camera is on the tripod and the (potentially) right composition is chosen, you will have to leave auto-mode and use shutter-priority or manual-mode.
Depending on the light conditions and amount of blur you want I will recommend shutter speeds close to 1 sec.
Depending on the light conditions and amount of blur you want I will recommend shutter speeds close to 1 sec.
Unfortunately it is not always as simple as described above. Because when pushing the shutter speed to blur the motion of the water you always risk ending up with an over exposure. With parts of the picture either partly or totally “blown out” with too much light. This will be bright white areas without any details (e.g. an over exposed sky will appear bright white without any contours).
There are different ways of dealing with this issue:
Low ISO – Keep the ISO speed as low as possible. (e.g. ISO 100). In that way the sensor is less sensitive to light (see the article on ISO speed for more information) and this will allow a longer shutter speed.
Aperture – If it is several hours after sunrise or before sunset there might be a lot of light so you have to close the aperture (e.g. f/22) This will let the smallest amount of light inside the camera during the long exposure. Below is an example of this.
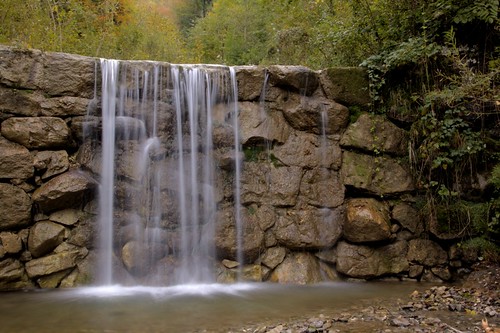
© Copyright by MunkPhotography.com
Exposure: 1 sec
Aperture: f/22
ISO 100
Focal length: 40mm
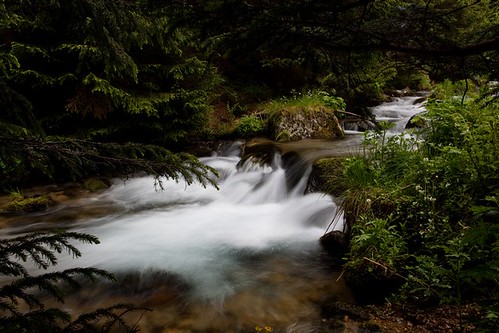
Time of the day – Pictures of water with a blurry effect is almost only possible if the weather is overcast or early in the morning or late in the evening. Again this is simply because there are too much light during daytime hours. Sometimes being in a dense forest create low enough light conditions to get a long enough shutter speed (see picture below which is taking on a sunny midday).
Another way is to do a very long exposure at night (like the second picture above, of Rhine fall)
Another way is to do a very long exposure at night (like the second picture above, of Rhine fall)
Filters – Now you might ask how these pictures with blue sky, sun and silky water are made. The simple answer to this is – use of filters. This is another great features you have with DSLR compared to compact cameras. You have the opportunity to put on different filters. In this case a ND-filter (Neutral Density filter). I will get further into this subject later on. But in short they work like sunglasses which are placed in front of the lens. Depending on the strength of the polarization they are letting less light through the lens.
Below are three examples of normally used ND-filters:
Below are three examples of normally used ND-filters:
- ND2 Reduces with 1 f/stop 50% of the light is transmitted
- ND4 Reduces with 2 f/stops 25% of the light is transmitted
- ND8 Reduces with 3 f/stops 12,5% of the light is transmitted
Note that there are other ways of using ND-filters, but this is what most use it for.
Now it is time to go out there and practice! Use this basic theory, but don’t be limited by it!
To end this subject I have found a couple of other examples and ways of capturing a waterfall.
First look for ways to make the waterfall a part of a bigger picture. Like this one where you might not notice the fall at first until your eyes follows the line created by the blue sky which leads directly to it.

Exposure: 1/50
Aperture: f/11
ISO 100
Focal length: 17mm

And finally you will sometimes need to introduce some recognizable objects in front of the falls to get a sense of perspective. And I will bet that you can come up with something a lot more original than this example. :-)

© Copyright by MunkPhotography.com
Exposure: 1/125
Aperture: f/18
ISO 100
Focal length: 17mm
Enjoy all the great wonders of water out there!